Posted on
Sunday, February 2nd, 2020
To make sure your 200-C and 200-CX are responding properly to the Hive App controls please follow the below steps to ensure the best performance:
200-C or 200-CX App QC
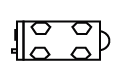
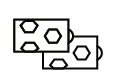
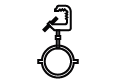
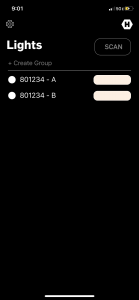
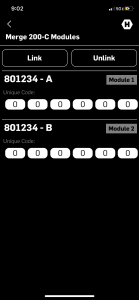
-If the light is a 200-C or 200-CX you may see 2 lights appear per unit in the Lights Menu on the app. Please follow the next steps to link this two internal modules and have your fixture appear as only one light in the App. Note you can only perform these steps on one 200-C at a time, be sure all other Hive LEDs are off, so that no other lights can be detected by the app.
- To begin to link the logic modules internally go to the Settings Menu.
- This can be found by clicking on the gear symbol on the upper left hand side of the Lights Menu opposite the Hive Lighting hexagonal logo.
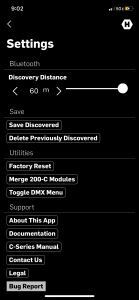
- Once in Settings Menu select “Merge 200-C Modules” under Utilities
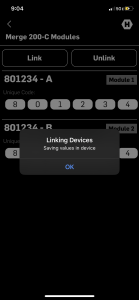
- In Merge menu enter the Serial number of the light in both Module 1 and Module 2 so that their Unique Codes match and are the serial number of the fixture.
- Scan for the Light and wait for the loading symbol in the upper right of the screen to disappear and be replaced by the SCAN button.
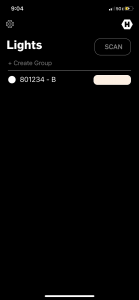
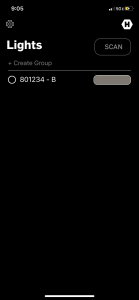
- Select the single Name of the Light (will be one of the two modules names) and test the app by turning the light on and off with the single white button to the left of the lights name.
- If it turns on and off fully test full connectivity by moving through each of the four basic controls in the SHOT menu. At this time you can also rename the light as per your preference.
Posted on
Tuesday, February 4th, 2020
- Engage DMX Mode: Flip the DMX Mode On/Off Switch to the up position, causing the DMX indicator light to turn on. This light tells you that you are now in DMX mode and can use a DMX board or CRMX transmitter to control the light.
- To Select Lumen Radio from the DMX input menu:
- Double click the selection knob to enter the DMX menu.
- Once the DMX menu is open single click the selection knob to select DMX input.
- Rotate the selection knob to select between CRMX and Local Wire. Select CRMX for wireless control, then single click the selection knob to exit to the main DMX menu double click to exit the menu.
- When you have successfully selected LumenRadio the DMX menu will now read CRMX on the OLED display on the back of the C-Series fixture.
- Link your LumenRadio transmitter. To successfully use wireless DMX with the C-Series lights, you must have a LumenRadio (CRMX) enabled transmitter connected to your DMX controller.
- To link your transmitter:
- Ensure the antenna is connected.
- Power on the transmitter and receiver(s).
- Ensure that the RF Link indicators on all receivers are off to indicate that the receiver(s) are ready to be linked (If necessary, follow the unlink procedure).
- On the transmitter, press and release the link button.
- The transmitter will search for any unlinked receivers. Its RF Link indicator will flash for 10 seconds and normal operation will resume.
- The RF Link indicator will change to a steady on-state on successfully linked receivers.
- To Unlink from a LumenRadio transmitter select:
- Double click the selection knob to enter the DMX menu.
- Once the DMX menu is open single click the selection knob to select linking.
- Click the selection knob to unlink, then confirm unlink.
Posted on
Tuesday, February 4th, 2020
C-Series lights have three additional menus for unique controls not available through the standard HSI-CCT control menu. These five menus can be accessed by double clicking the selection knob on the on the back of the C-Series fixture. This will bring up the Additional Menus Screen and offer you 5 Menu choices: EFFECTS, SOURCES, PROFILES, CORRECTIVE, SYSTEM INFO.
Effects Menu
- To access the Effects menu first double click the SELECT knob to access the additional menus screen.
- There single click the SELECT knob when the screen reads “MENU 1/5 Effects”.
- To select different effects turn the SELECT knob to scroll between 8 different effects: Cop Car 1, Cop Car 2, Emergency 1, Emergency 2, Emergency 3, Club Lights, Paparazzi, Color Chase, Fire, Fireworks, Pulsing, TV, Lightning.
- The effects can be adjusted either with dimming control or speed control or both dimming and speed control. To adjust the dimming or speed control on any effect turn the ADJUST knob to reach the desired level as indicated on a scale of 1-100%. To toggle between adjusting speed and dimming on an effect with both controls click the select knob once.
- To exit the Effects menu to the Additional Menus Screen single click the ADJUST knob.
Sources Menu
- To access the Sources menu first double click the SELECT knob to access the additional menus screen. There single click the SELECT knob when the screen reads “MENU 2/5 Sources”.
- To select different sources turn the SELECT knob to scroll between 40 preset sources:
Violet Glo Stick, Pink Glo Stick, Yellow Glo Stick, Red Glo Stick, Green Glo Stick, Blue Glo Stick, Red Traffic Light, Yellow Traffic Light, Green Traffic Light, Amber Caution, Road Flare, Blow Torch, Bioluminescence, Computer Monitor, Mobile Phone, Sun Blue Hour, Sun Overcast, Sun Direct, Gaslight, Candlelight, Antique Bulb, Warm Antique Bulb, Christmas Lights, Night Light, Heat Lamp, Grow Light, Tungsten, Incandescent, Halogen, HMI, High Pressure Sodium, Low Pressure Sodium, Mercury Vapor, Metal Halide, Ceramic, Carbon Arc, Xenon, Blacklight, Cool White Fluorescent, Warm White Fluorescent
- The sources can be adjusted with dimming control. To adjust the dimming turn the ADJUST knob to reach the desired level as indicated on a scale of 1-100%.
- To exit the Effects menu to the Additional Menus Screen single click the ADJUST knob.
Profiles Menu
- To access the Profiles menu first double click the SELECT knob to access the additional menus screen. There single click the SELECT knob when the screen reads “MENU 3/5 Profiles”.
- To select different Profiles turn the SELECT knob to scroll between 3 different profiles: Photo, Cinema, Broadcast
- To exit the Profiles menu to the Additional Menus Screen single click the ADJUST knob.
- Once the profile is selected and the Additional Menu Screen is exited the OLED display will indicate the selected profile with a letter in the upper right hand corner of the display. “P” for Photo, “C” for Cinema, “B” for Broadcast.
Corrective Menu
- To access the Corrective menu first double click the SELECT knob to access the additional menus screen. There single click the SELECT knob when the screen reads “MENU 4/5 Corrective”.
- To select different Corrective Presets turn the SELECT knob to scroll between multiple different corrective presets: + (1/8, 1/4, 1/2, Full) Green Daylight, + (1/8, 1/4, 1/2, Full) Green Tungsten, – (1/8, 1/4, 1/2, Full) Green Daylight and – (1/8, 1/4, 1/2, Full) Green Tungsten, (1/8, 1/4, 1/2, Full) CT Straw Daylight, (1/8, 1/4, 1/2, Full) CT Straw Tungsten.
- The sources can be adjusted with dimming control. To adjust the dimming turn the ADJUST knob to reach the desired level as indicated on a scale of 1-100%.
- To exit the Effects menu to the Additional Menus Screen single click the ADJUST knob.
System Info
- To access the System Info menu first double click the SELECT knob to access the additional menus screen. There single click the SELECT knob when the screen reads “MENU 4/5 System Info”.